Wi-Fi模块Demo图文详解模块方法
本文出自APICloud官方论坛,感谢论坛版主 Mr.ZhouHeng 的分享。
第一步我们需要在开发控制台创建一个Native App应用以及添模块的准备工作:

按照下图步骤
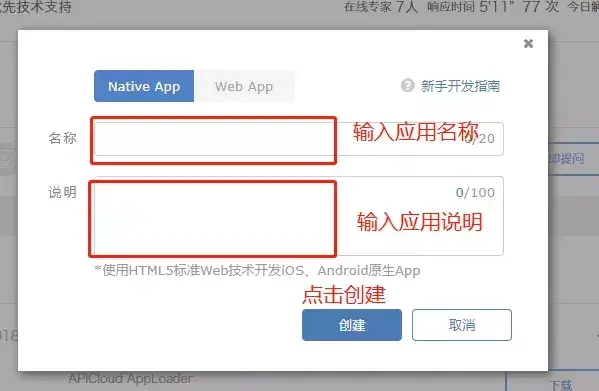
输入完点创建完成之后

最好点击添加按钮之后返回看看你是否添加了需要的模块,添加完模块之后在点击自定义的

然后云端操作就完成 接下来我们把云端代码拉取到本地

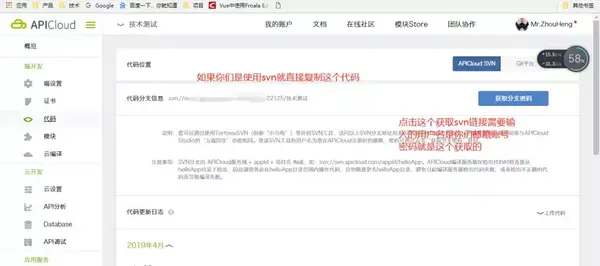
通过svn拉取本地 使用开发工具直接打开拉取到本地的代码进行开发;
如果你们使用的是官网工具apicloud-studio-2.exe
那么请看下面的链接教程把代码拉取到本地:
https://docs.apicloud.com/Dev-Tools/studio-dev-guide
拉取代码成功之后在工具的结构:
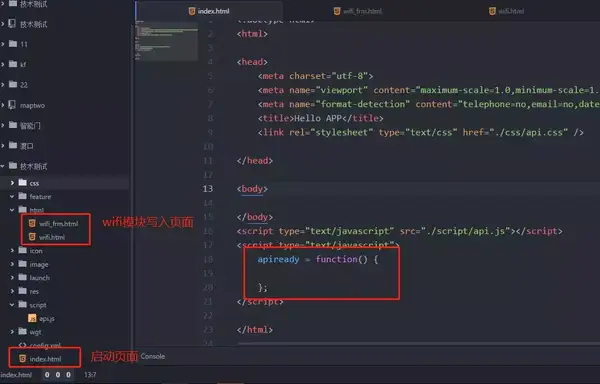
然后我们再打开Wi-Fi文档
https://docs.apicloud.com/Client-API/Device-Access/wifi
这个路径其实直接在模块对应点击模块名字就能进入到模块文档的 ,每个模块都有这个;
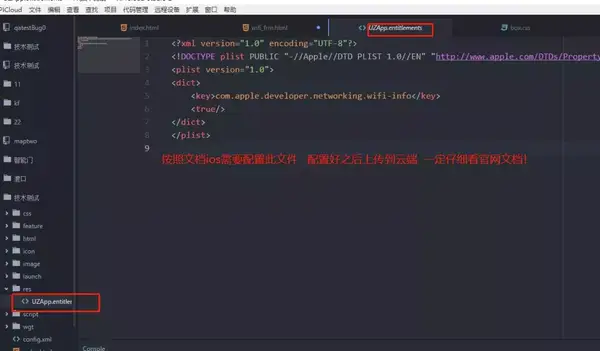
ios需要特别注意文档里面提示需要添加的文件:
wifi_frmhtml,
body {
background-color: #ededed;
}
.list-item {
margin-top: 1px;
padding: 15px 10px;
font-size: 14px;
line-height: 180%;
position: relative;
background-color: #fff;
}
.list-item:after {
content: " ";
position: absolute;
z-index: 77;
left: 0;
top: 0;
width: 200%;
height: 200%;
border-bottom: 1px solid #d4d4d4;
-webkit-transform-origin: 0 0;
transform-origin: 0 0;
-webkit-transform: scale(.5, .5);
transform: scale(.5, .5);
}
.left {
padding: 0px 10px;
line-height: 220%;
color: #333;
}
.list-item .title {
padding: 0px 10px;
line-height: 220%;
color: #333;
position: relative;
z-index: 88;
}
.list-item .right {
position: relative;
z-index: 99;
}
.list-item .right .state {
display: inline-block;
vertical-align: middle;
border-radius: 20px;
width: 38px;
height: 21px;
text-align: center;
line-height: 20px;
font-size: 12px;
color: #fff;
}
.list-item .right .open {
background-color: #00acff;
}
.list-item .right .open::after {
content: " ";
float: right;
margin-top: 1px;
margin-right: 1px;
width: 19px;
height: 19px;
border-radius: 50%;
background-color: #fff;
box-shadow: 0px 0px 1px 1px #d4d4d4;
-webkit-transition: all 0.2s linear;
transition: all 0.2s linear;
}
.list-item .right .close {
background-color: #ededed;
}
.list-item .right .close::after {
content: " ";
float: left;
margin-top: 1px;
margin-left: 1px;
width: 19px;
height: 19px;
border-radius: 50%;
background-color: #fff;
box-shadow: 0px 0px 1px 1px #d4d4d4;
-webkit-transition: all 0.2s linear;
transition: all 0.2s linear;
}
.center {
text-align: center;
}
.list-item .active {
color: #00acff
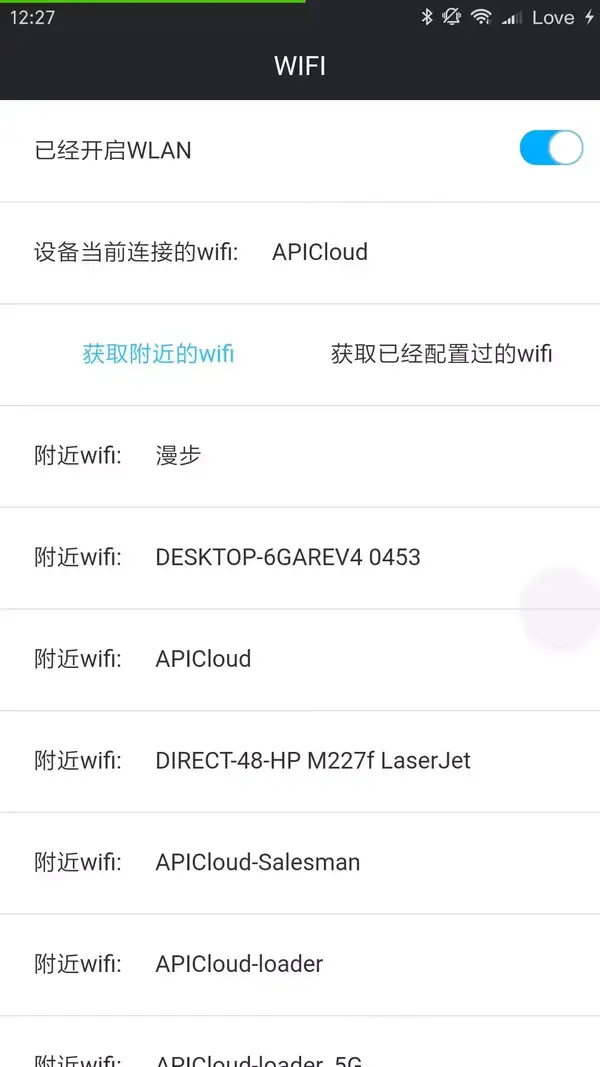
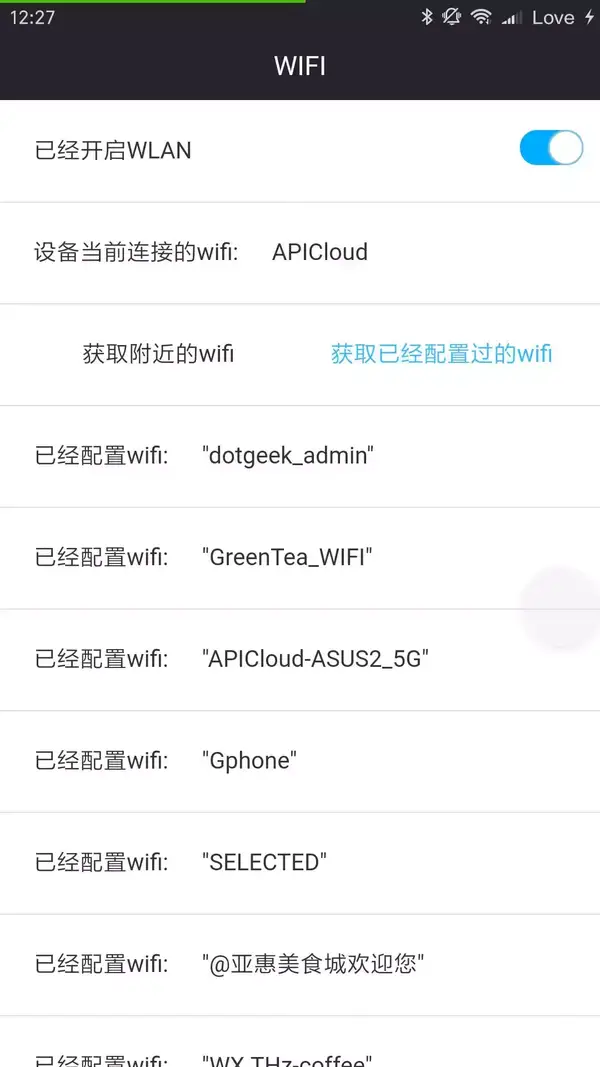
}{{state == true ? '已经开启WLAN' : '已经关闭WLAN'}}设备当前连接的wifi:{{current}}获取附近的wifi获取已经配置过的wifi{{tab == false ? '附近' : '已经配置'}}wifi:{{list.ssid}}var eWifi;
apiready = function() {
fnInVue();
}
function fnInVue() {
window.ListVue = new Vue({
el: ".list",
data: {
current: '',
items: [],
show: false,
state: false,
tab: false
},
mounted: function() {
this.$nextTick(function() {
fnInit();
});
},
methods: {
fnSwitch: function(states) {
console.warn(states);
if (states) {
fnCloseWifi();
} else {
fnOpenWifi();
}
},
fnScanWifi: function() {
if (this.tab === false) {
return;
}
this.tab = false;
fnScanWifiList();
},
fnGetWifi: function() {
if (this.tab === true) {
return;
}
this.tab = true;
fnGetConfiguredNetworks();
},
}
});
}
function fnInit() {
eWifi = api.require('wifi');
// 判断是ios还是安卓 从而是否显示对应权限
window.ListVue.show = api.systemType == 'ios' ? false : true;
// 获取当前wifi
fnObtainCurrent();
// 获取附近链接的wifi
fnScanWifiList();
};
// 获取当前wifi
function fnObtainCurrent() {
后面代码请下载源码自行研究复制代码 赞 (0)