ai图片随意拉伸变形(ai怎么拉伸图片不变形)
原文链接:
https://ai.baidu.com/forum/topic/show/953780
一、功能描述
当我们看电影的时候,有时候如果电影的比例不对,会发现电影看的相当别扭。同理,当我们看一张图片时,如果感到这张图片让人看起来很别扭,那就有可能是这张图片的长宽比例不对,这时候就可以采取百度拉伸图片恢复技术,将图像内容恢复成正常比例。
二、使用攻略
说明:本文采用C# 语言,开发环境为.Net Core 2.1,采用在线API接口方式实现。
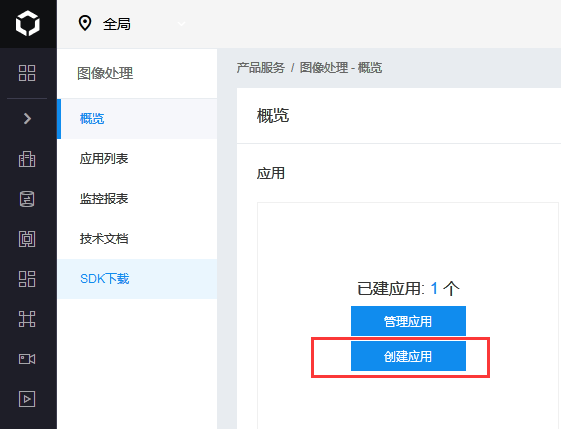
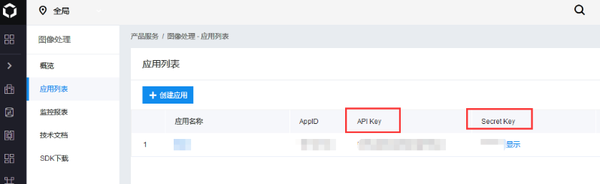
(1)平台接入
登陆 百度智能云-管理中心 创建 “图像处理”应用,获取 “API Key ”和 “Secret Key” :
https://console.bce.baidu.com/ai/?_=1564037948120#
/ai/imageprocess/overview/index
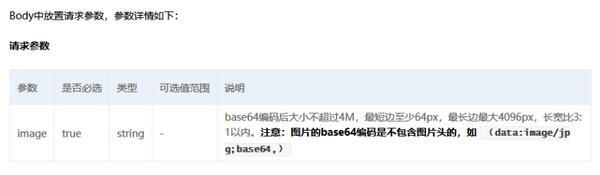
(2)接口文档
文档地址:https://ai.baidu.com/docs#
/ImageProcessing-API/f83bad8b
接口描述:自动识别过度拉伸的图像,将图像内容恢复成正常比例。
请求说明
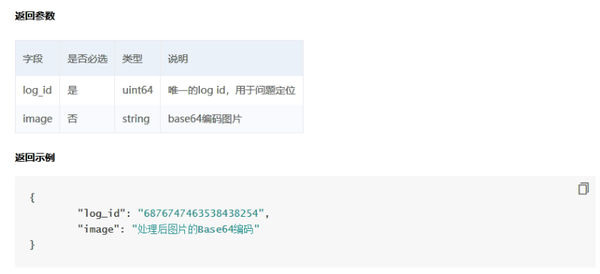
返回说明
(3)源码共享
3.1-根据 API Key 和 Secret Key 获取 AccessToken
 ///
 /// 获取百度access_token
 ///
 /// API Key
 /// Secret Key
 ///
 public static string GetAccessToken(string clientId, string clientSecret)
 {
 string authHost = "https://aip.baidubce.com/oauth/2.0/token";
 HttpClient client = new HttpClient();
 List> paraList = new List>();
 paraList.Add(new KeyValuePair("grant_type", "client_credentials"));
 paraList.Add(new KeyValuePair("client_id", clientId));
 paraList.Add(new KeyValuePair("client_secret", clientSecret));
 HttpResponseMessage response = client.PostAsync(authHost, new FormUrlEncodedContent(paraList)).Result;
 string result = response.Content.ReadAsStringAsync().Result;
 JObject jo = (JObject)JsonConvert.DeserializeObject(result);
 string token = jo["access_token"].ToString();
 return token;
 }
3.2-调用API接口获取识别结果
1、在Startup.cs 文件 的 Configure(IApplicationBuilder app, IHostingEnvironment env) 方法中开启虚拟目录映射功能:
 string webRootPath = HostingEnvironment.WebRootPath;//wwwroot目录
 app.UseStaticFiles(new StaticFileOptions
 {
 FileProvider = new PhysicalFileProvider(
 Path.Combine(webRootPath, "Uploads", "BaiduAIs")),
 RequestPath = "/BaiduAIs"
 });
2、 建立Index.cshtml文件
2.1 前台代码: 由于html代码无法原生显示,只能简单说明一下:
主要是一个form表单,需要设置属性enctype="multipart/form-data",否则无法上传图片;
form表单里面有四个控件:
一个Input:type="file",asp-for="FileUpload" ,上传图片用;
一个Input:type="submit",asp-page-handler="StretchRestore" ,提交并返回识别结果。
一个img:src="@Model.curPath",显示需要识别的图片。
一个img:src="@Model.imgProcessPath",显示车辆分割后的前景抠图。
最后显示后台 msg 字符串列表信息,如果需要输出原始Html代码,则需要使用@Html.Raw()函数。
2.2 后台代码:
 [BindProperty]
 public IFormFile FileUpload { get; set; }
 [BindProperty]
 public string ImageUrl { get; set; }
 private readonly IHostingEnvironment HostingEnvironment;
 public List msg = new List();
 public string curPath { get; set; }
 public string imgProcessPath { get; set; }
 public ImageProcessModel(IHostingEnvironment hostingEnvironment)
 {
 HostingEnvironment = hostingEnvironment;
 }
 public async Task OnPostStretchRestoreAsync()
 {
 if (FileUpload is null)
 {
 ModelState.AddModelError(string.Empty, "本地图片!");
 }
 if (!ModelState.IsValid)
 {
 return Page();
 }
 msg = new List();
 string webRootPath = HostingEnvironment.WebRootPath;//wwwroot目录
 string fileDir = Path.Combine(webRootPath, "Uploads//BaiduAIs//");
 string imgName = await UploadFile(FileUpload, fileDir);
 string fileName = Path.Combine(fileDir, imgName);
 string imgBase64 = Common.GetFileBase64(fileName);
 curPath = Path.Combine("/BaiduAIs/", imgName);//需在Startup.cs 文件 的 Configure(IApplicationBuilder app, IHostingEnvironment env)方法中开启虚拟目录映射功能
 string result = GetImageJson(imgBase64, “你的API KEY”, “你的SECRET KEY”);
 JObject jo = (JObject)JsonConvert.DeserializeObject(result);
 try
 {
 string imageProcessBase64 = jo["image"].ToString();
 msg.Add("拉伸图像恢复");
 msg.Add("log_id:"   jo["log_id"].ToString());
 string processImgName = Guid.NewGuid().ToString("N")   ".png";
 string imgSavedPath = Path.Combine(webRootPath, "Uploads//BaiduAIs//", processImgName);
 imgProcessPath = Path.Combine("BaiduAIs//", processImgName);
 await GetFileFromBase64(imageProcessBase64, imgSavedPath);
 }
 catch (Exception e)
 {
 msg.Add(result);
 }
 return Page();
 }
 ///
 /// 上传文件,返回文件名
 ///
 /// 文件上传控件
 /// 文件绝对路径
 ///
 public static async Task UploadFile(IFormFile formFile, string fileDir)
 {
 if (!Directory.Exists(fileDir))
 {
 Directory.CreateDirectory(fileDir);
 }
 string extension = Path.GetExtension(formFile.FileName);
 string imgName = Guid.NewGuid().ToString("N")   extension;
 var filePath = Path.Combine(fileDir, imgName);
 using (var fileStream = new FileStream(filePath, FileMode.Create, FileAccess.Write))
 {
 await formFile.CopyToAsync(fileStream);
 }
 return imgName;
 }
 ///
 /// 返回图片的base64编码
 ///
 /// 文件绝对路径名称
 ///
 public static String GetFileBase64(string fileName)
 {
 FileStream filestream = new FileStream(fileName, FileMode.Open);
 byte[] arr = new byte[filestream.Length];
 filestream.Read(arr, 0, (int)filestream.Length);
 string baser64 = Convert.ToBase64String(arr);
 filestream.Close();
 return baser64;
 }
 ///
 /// 文件base64解码
 ///
 /// 文件base64编码
 /// 生成文件路径
 public static async Task GetFileFromBase64(string base64Str, string outPath)
 {
 var contents = Convert.FromBase64String(base64Str);
 using (var fs = new FileStream(outPath, FileMode.Create, FileAccess.Write))
 {
 fs.Write(contents, 0, contents.Length);
 fs.Flush();
 }
 }
 ///
 /// 图像识别Json字符串
 ///
 /// 图片base64编码
 /// API Key
 /// Secret Key
 ///
 public static string GetImageJson(string strbaser64, string clientId, string clientSecret)
 {
 string token = GetAccessToken(clientId, clientSecret);
 string host = "https://aip.baidubce.com/rest/2.0/image-process/v1/stretch_restore?access_token="   token;
 Encoding encoding = Encoding.Default;
 HttpWebRequest request = (HttpWebRequest)WebRequest.Create(host);
 request.Method = "post";
 request.KeepAlive = true;
 string str = "image="   HttpUtility.UrlEncode(strbaser64);
 byte[] buffer = encoding.GetBytes(str);
 request.ContentLength = buffer.Length;
 request.GetRequestStream().Write(buffer, 0, buffer.Length);
 HttpWebResponse response = (HttpWebResponse)request.GetResponse();
 StreamReader reader = new StreamReader(response.GetResponseStream(), Encoding.Default);
 string result = reader.ReadToEnd();
 return result;
 }
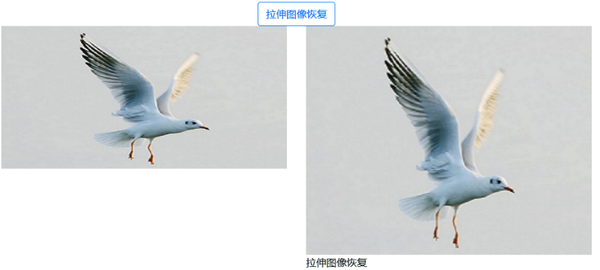
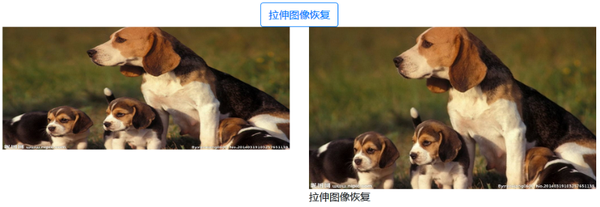
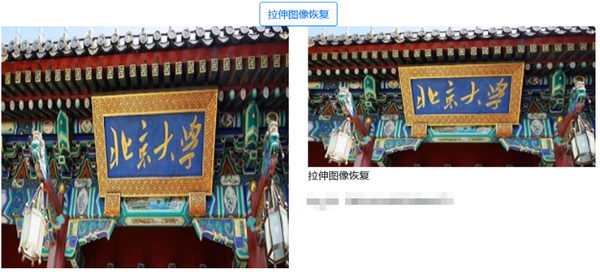
三、效果测试
1、页面:

2、识别结果:
2.1
2.2
2.3
四、使用结果
从上图可以看出,百度的拉伸图片恢复技术还是不错的,基本上能将图片恢复成正常的比例,让人看后感觉顺眼多了。
相关推荐
-

怎么在AI中截去不需要的图片部分
有的小伙伴在使勇AI软件编辑图片时,觉得并不需要图片中的某一部分,因此想要截去不需要的图片部分,但是却不知道如何截去,那么小编就来为大家介绍一下吧.具体如下:1. 第一步,双击或者右击打开AI软件,接 ...
-
怎么在电脑版Ai中导出格式为pdf的图片
电脑版Ai软件被很多人使用,用来编辑图片等,有的用户在使用该软件时,想要导出格式为pdf的图片,但是却不知道如何导出,那么小编就来为大家介绍一下吧.具体如下:1. 第一步,双击或者右击打开Adobe ...
-
illustrator怎么导入图片?如何把图片拖入ai里
在AI里,把图片导入到操作界面中,有几种的操作方式的:下面,小编给大家详细说下. 没有新建画板的情况下 01 方法一 我们打开软件,进入到操作界面: 鼠标放在界面中间空白位置,双击 02 弹出打开图片 ...
-
photoshop怎么随意拉伸图片
photoshop中怎么样可以随意的拉伸图片,让小编教给你操作指南. 操作方法 01 打开ps应用程序. 02 打开需要拉伸的图片. 03 点击右侧的图层,将原始图片解锁. 04 点击工具栏中的编辑标 ...
-
如何在PS软件拉伸图片的时候确保不变形
我们在PS软件中编辑图片的时候,经常会用到缩放拉伸的操作,想要在拉伸的时候保持图片不变形,该怎么操作呢?今天就跟大家介绍一下如何在PS软件拉伸图片的时候确保不变形的具体操作步骤.1. 首先打开电脑上的 ...
-
PS拉伸图片怎么保护人物不变形
PS是一款功能强大的图片编辑软件,有些用户想知道PS拉伸图片怎么保护人物不变形,接下来小编就给大家介绍一下具体的操作步骤.具体如下:1. 首先第一步打开电脑中的[PS]软件,根据下图所示,导入需要编辑 ...
-
怎么通过PS拉伸图片并且不变形
PS是现在十分常用的一款图片编辑软件,有些新用户不知道怎么通过PS拉伸图片并且不变形,接下来小编就给大家介绍一下具体的操作步骤.具体如下:1. 首先第一步先打开PS,接着导入相关图片,然后根据下图所示 ...
-
怎样拉伸图片不让主体/人物/静物变形
有时候处理图片发现差一点就能铺满了,但是图片内容不适合直接拉伸.那么怎么办呢,PS的新功能里面的内容识别比例就能解决这个问题. 操作方法 01 如下图片,不能铺满. 02 直接拉伸,人物就严重变形. ...
-
PS拉伸图片不变形
平时拉伸图片时,图片会变形,特别是人物,下面给大家分享个小窍门,可让图片不会变形. 操作方法 01 打开软件及图片 02 直接拉宽图片就变形了,特别是人物 03 编辑→内容识别比例 04 然后在菜单栏 ...
-
ps怎么拉伸图片不变形
我们在处理图片时,经常会遇到需要拉伸图片的情况,一般的拉伸都会使图片变形,那么怎么拉伸图片不变形呢?下面介绍一下在ps中拉伸图片不变形的方法,希望对你有所帮助. ps怎么拉伸图片不变形 01 第一步: ...
